Enable Browser Caching Speed Up Your Website Now
Did you know that a slow website can lose up to 40% of its potential customers? In today’s fast-paced digital world, website speed is paramount. One of the simplest yet most effective ways to drastically improve your website’s performance is by enabling browser caching.
But what exactly is browser caching, and why does it matter? Essentially, it’s like giving your visitor’s browser a cheat sheet. When someone visits your site, certain elements like images, stylesheets, and scripts are stored locally on their computer.
The next time they visit, their browser can load these elements from its own storage instead of downloading them again from your server, resulting in significantly faster loading times. In this article, we’ll break down how to enable browser caching, explore its many benefits, and equip you with the knowledge to create a blazing-fast experience for your website visitors, ultimately boosting engagement and conversions.
Let’s dive in!
Unlocking Website Speed: A Deep Dive into Browser Caching
Ever noticed how some websites load blazingly fast after your first visit? That’s often the magic of browser caching at work. It’s a potent technique for boosting website performance.
In essence, browser caching is like giving your web browser a short-term memory. It stores copies of static resources, ensuring quicker access next time.
We’re talking about images, stylesheets (CSS), JavaScript files, and even fonts. When a visitor returns, their browser retrieves these assets locally.
No more redundant trips to the server, which results in reduced loading times and a smoother user experience. It’s a win-win situation for everyone involved.
Why Browser Caching Matters for Your Website
In today’s fast-paced online world, speed is king. Website loading time directly impacts user engagement, bounce rates, and even search engine rankings.
A slow website can frustrate visitors, leading them to abandon your page before they even see your content. Browser caching helps combat this by making your site feel instantaneous.
Imagine the frustration of repeatedly downloading the same logo every time you visit a page. Browser caching eliminates this inefficiency. Think of bandwidth costs too.
Beyond user experience, search engines like Google also consider site speed as a ranking factor. A faster website improves your chances of higher visibility in search results.
Faster loading times mean less bandwidth consumption. This translates to cost savings for website owners, particularly those with high traffic volumes.
How Browser Caching Works: The Technical Rundown
When a user visits a webpage for the first time, the browser downloads all the necessary resources from the web server. This is standard operating procedure for web browsing.
The server sends HTTP headers along with these resources. These headers contain instructions for the browser regarding caching behavior.
Among these headers are directives like ‘Cache-Control’ and ‘Expires.’ These dictate how long the browser should store the resources locally.
The ‘Cache-Control’ header allows for granular control, specifying maximum age, public or private caching, and other caching options. The ‘Expires’ header sets a specific date and time when the cached resource should be considered stale.
When the user revisits the page, the browser checks its cache for the requested resources. If found and still valid (not expired), it serves them directly from the local cache.
If the resource is not found or has expired, the browser sends a request to the server to fetch the updated version. This ensures users always get the latest content.
Implementing Browser Caching: Practical Steps
Enabling browser caching can be done through various methods, depending on your web server and content management system (CMS).
For Apache servers, you can leverage the ‘.htaccess’ file to configure caching rules. Add directives like ‘ExpiresByType’ or ‘Cache-Control’ to specify caching behavior for different file types.
If you’re using Nginx, you can modify the server configuration file (nginx.conf) to set caching headers. The approach is similar to Apache but uses different syntax.
Many popular CMS platforms, like WordPress, offer plugins that simplify the process of enabling browser caching. These plugins often provide a user-friendly interface for managing caching settings. Consider plugins like W3 Total Cache, or WP Rocket.
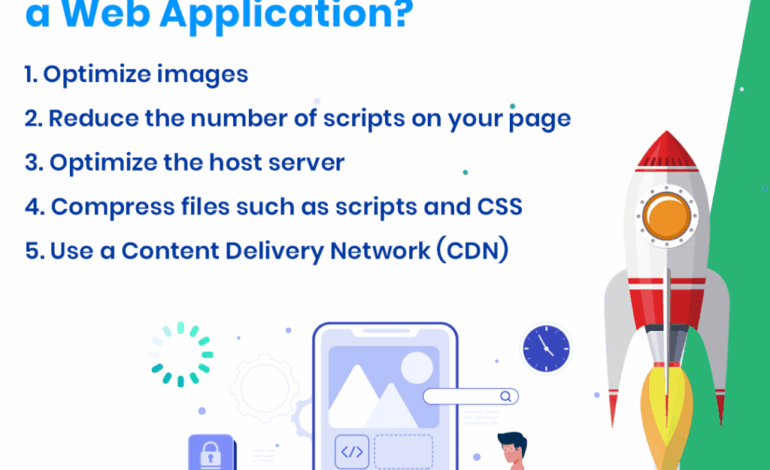
Content Delivery Networks (CDNs) also play a vital role in browser caching. They distribute your website’s content across multiple servers globally, improving loading times for users in different geographic locations.
Testing and Verifying Browser Caching
After implementing browser caching, it’s crucial to verify that it’s working correctly. You can use browser developer tools to inspect HTTP headers and check caching behavior.
Most modern browsers have developer tools accessible by pressing F12 or right-clicking on a webpage and selecting “Inspect.”
In the developer tools, navigate to the “Network” tab. This tab displays all the requests made by the browser and their corresponding HTTP headers.
Look for the ‘Cache-Control’ and ‘Expires’ headers in the response headers of static resources. Verify that they are set according to your intended caching rules.
Tools like Google PageSpeed Insights and GTmetrix can also provide insights into your website’s caching configuration and suggest improvements.
Troubleshooting Common Browser Caching Issues
Sometimes, browser caching can cause unexpected behavior. For example, users might see outdated content even after you’ve updated your website.
This can happen if the browser is still serving cached versions of the files. To force the browser to refresh the cache, you can use cache-busting techniques.
Cache busting involves adding a version number or a unique identifier to the filenames of your static resources. For example, ‘style.css’ becomes ‘style.css?v=1.1’.
When you update the files, you change the version number, forcing the browser to download the new version. Regularly check file permissions.
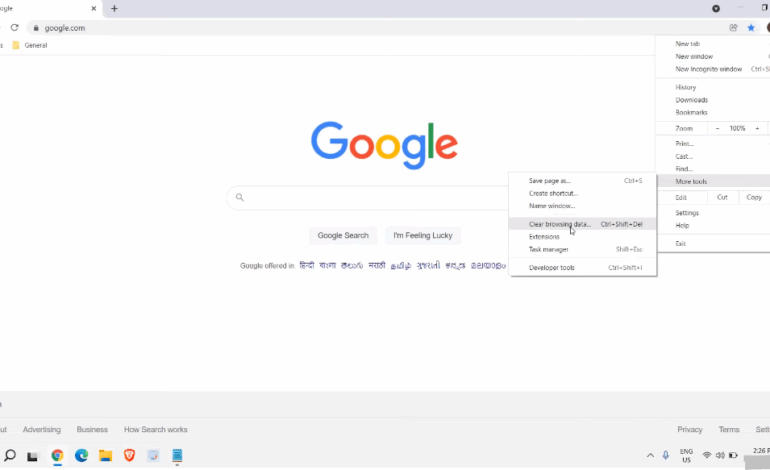
Clearing the browser cache can also resolve caching issues. Provide instructions for your users on how to clear their browser cache if they encounter problems.